Table of Contents
Golden Rules
- You must be in a dark room. Don't try to adjust your CRT in broad daylight. You won't be able to achieve proper black levels
- You must do these steps in order. If your CRT can't perform one or more of the adjustments here then it is likely you won't be able to get a great result overall.
- Don't play with any settings you don't understand. Always write down any numerical values or make note of potentiometer orientation before playing around.
Download 240p Test Suite
This is a must for calibrating a CRT properly. It contains several different test patterns that make calibrating a CRT by eye possible. If you have a way to run downloaded SNES roms, I suggest downloading my customized version which contains a convergence test. We will use this test later in the guide. If you don't have any way of running a downloaded image on any of your consoles, you can buy a premade SNES cartridge of 240p test suite off of eBay.
Resetting to "Neutral"
Before any adjustments are made to the CRT, you should put it in as close to neutral as possible for the following settings:
- Brightness
- Contrast
- Color
- Sharpness
If your CRT has knobs for any of the adjustments above, neutral position is usually the middle of the knob's rotation.
If your CRT has digital adjustments for any of the adjustments above, neutral position is usually the middle of the adjustment range.
If your CRT has an "Aperture" adjustment, turn it all the way down.
Purity
If your CRT has any areas of discoloration in the sides/corners, this is a purity issue. Generally what's happening here is a magnetic field has developed in your CRT's mask/grille and it's pulling the wrong colors electron beam into the mask holes it doesn't belong, causing weird purple/yellow discoloration.
The best way to check your CRT's Purity is to display a solid green screen. In 240p Test Suite, go to the "White and RGB Screens" test, and press Right Trigger/Shoulder on your controller to switch from White, Black, Red, Green, and Blue full screen colors.
Look at the fullscreen Green for any areas of the monitor with inconsistent green color. If you see any areas that are discolored, you need to degauss your CRT.
There are many methods of degaussing but I don't go into it here - this is a good resource to read.
If degaussing doesn't resolve the color impurities on your monitor, you need to adjust one or both of the color purity rings on the yoke. This process isn't as scary as it sounds, check your CRT's service manual to see if it has any instructions for purity adjustment. Make sure you mark the initial orientation of the purity AND convergence rings on your yoke with a sharpie just in case you need to reset everything to factory! Once you're ready to make adjustments, generally you just need to rotate one of the purity rings while watching the green screen until all of the impurities are gone.
Adjusting Sub Controls
Once you've neutralized all the important settings mentioned in the previous step and verified your CRT's purity is good, it's time to adjust sub controls. Sub controls are the baseline adjustments for what the "customer" controls adjust based from. It's a relative adjustment point from the controls that are provided to the customer, either on the front of the CRT or within an OSD menu.
For older CRTs (ones without OSD menus, and even some that do have menus), sub control adjustments are usually found inside the CRT via potentoimeters. Refer to your CRT's service manual for more information.
For newer CRTs with OSD menus, it's likely that your sub controls will be located in the service menu. Refer to your CRT's service manual for more information
Sub Brightness
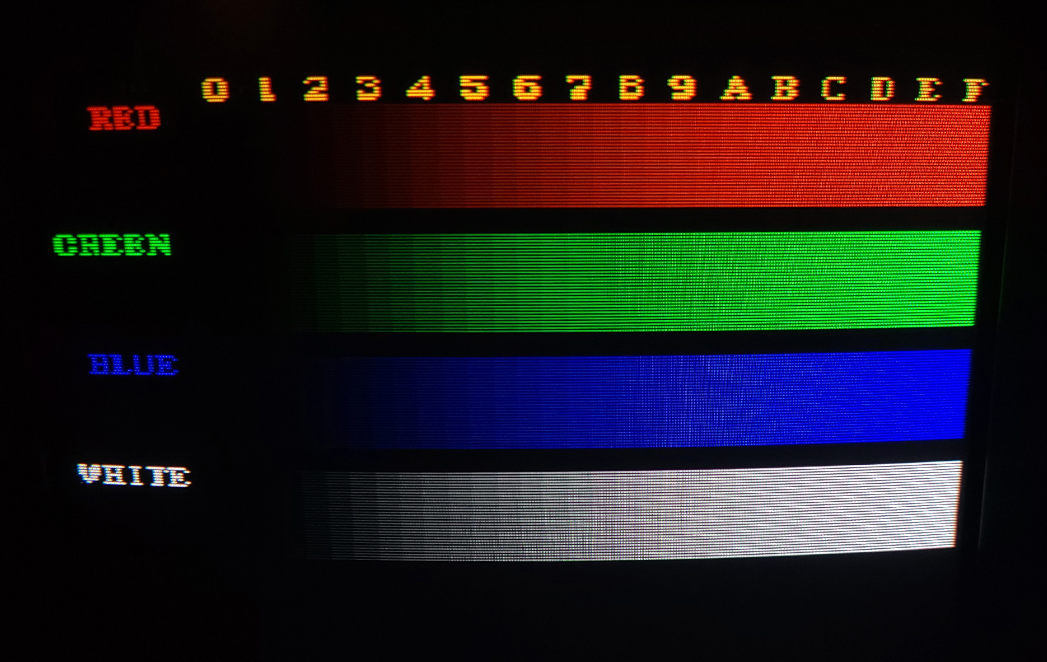
In 240p Test Suite under the "Test Patterns" submenu, select the "Color Bars" test. This is a test which shows 3 important color bars (Red, Green, Blue), and their combination - White. Now we will adjust the CRT's brightness.
Newer CRTs usually have a potentiometer or OSD adjustment for sub brightness. However, if your CRT does not have one (or you can't get the brightness you need from the one you found), the way to adjust sub brightness is via a "SCREEN" knob on the Flyback Transformer. This is usually a big black plastic transfomer with a thick red wire coming out of it and leading to the top of the CRT. It usually has two adjustment knobs on it, one for Focus and one for Screen.
Once you've found your sub brightness adjustment, you want to slowly raise it until you start to see a fuzzy grey instead of black in the background of the color bars test. Once you get to that point, you will see something called "raster lines" appear in the black background. Raster lines are bad, it means the tube is too bright. So one you see them, slowly back down your brightness control until you get a nice black level with no lines or fuzz.
Sub Contrast
Open up the Color Bars test again. Look at the top row of letters and numbers. When a CRT has good contrast, the difference in brightness from "C" to "F" should be nearly indistinguishable. If the bars beyond C still look the same brightness, or if you can see a clear falloff in brightness between C and F, you need to raise or lower the contrast.
After the sub adjustments are made correctly, you can just leave your customer controls in neutral position! If your cat ever messes with your settings, you'll know where to reset them :)
RGB Drive/Bias using Color Bars Test
CRTs use 3 colors Red, Green, and Blue to display images. Each color is represented by an electron beam which is shot at the back of the tube and illuminates phosphors on the inside of the glass. The beams are aligned using a sheet of little holes behind the phosphors, called a mask. The holes on this mask are arranged in pairs of 3 - which when illuminated simultaneously - appear as a white dot. The type of mask in the CRT determines what type of group you'll see (Slot  ) (Dot/Shadow
  ) (Aperture
  ). The TV will individually vary the brightness of these combined beams to adjust what color you see for each "spot" on the screen, which is how full color images are formed. Therefore the best way to calibrate a CRT is by individually calibrating each of these 3 base colors to display perfectly. By doing this we will ensure that any image they display will look perfect too.
DO NOT DO THIS TEST WITH A NES OR SEGA GENESIS These versions of 240p test suite only provide a basic 8-bit color bar pattern which does not have enough color depth to do a drive/bias adjustment with proper cutoff adjustment. These versions are only useful for making sure your CRT can display all 3 primary colors.
Open the color bars test again in 240p Test Suite. A "good" color bar test screen will show an equal length for all 3 color bars. If any of the bars are shorter (or longer) than the others, that color is either turned up too high or too low. The bars should be even, and they should fall off completely to black by about the "1" or "2" column on the left side.
Most CRTs have drive/gain adjustment potentiometers on the neck board or in the service menu. You may find that your CRT only has adjustments for two colors... this is normal! The 3rd missing color should be adjusted using sub brightness or the SCREEN knob on the Flyback! Get the 3rd color to falloff by about the "1" or "2" column on the left side, then use your remaining drive/bias potentiometers to fix the other two colors the same way. They don't have to all be in absolute pixel perfect alignment but try to get them as close as possible. When they are in good alignment you will get a nice pure white color bar on the bottom of the test:
Convergence
Earlier in this guide I talked about how CRTs use 3 colors pointed at the same spot to make a color. In order for the color to be accurate (and images to be sharp), the 3 electron guns need to be in perfect alignment. If one or more colors is out of alignment, it will make things like text look fuzzy or worse.
In 240p Test Suite, open the Convergence test from the Test Patterns sub menu (this menu is only available in my SNES ROM linked above). This menu displays a crosshatch pattern of red, green, and blue crosses. The reason they are seperate colors is so that the CRT draws each cross with a single electron gun. This makes it very easy to see which colors are out of alignment - you can look at the tips of each cross where they meet a different color cross tip. If you see any edges higher or lower, overlapping, or skewed left/right of their adjacent cross, one or both of those colors are out of alignment. There is an order to which the colors should be corrected (usually red and blue first, then green) which can be found in your CRT's service manual.
Horizontal & Vertical Static Convergence is adjusted using sets of magnetic rings on the deflection yoke. Some PVMs have an "H-Stat" adjustment potentiometer which can adjust horizontal static convergence, and BVMs have an entire sub-menu of the service menu devoted to different convergence adjustments that can be made digitally. Static convergence refers to adjusting the entire screens' convergence at once. Dynamic Convergence refers to adjusting convergence in the corners of the screen.
If you have symmetric dynamic convergence issues (i.e. you have 2 opposite corners with similar convergence problems), or an entire half of the screen has bad convergence, you need to physically adjust the yoke. Up/down yoke movement causes the convergence to swivel clockwise/counterclockwise which can dial in symmetric corner problems. Left/right yoke movement causes expansion/contraction at the outer edges of the screen (not center or corners).
In any case, you should refer to your CRT's service manual for specific instructions on adjusting convergence.
Additional Notes
Calibration trick for older/more basic monitors
Here is a simple calibration technique that is especially effective on older CRTs as noted by @LukeEvansSimon:
A calibration technique that I am calling “lower brightness, raise screen, lower contrast”, without any modding, you can get a much sharper cathode ray than what CRTs are typically calibrated to give. First set brightness as low as it goes.
Then increase screen to get black levels correct.
Finally, lower contrast until peak white is just about to turn grey.
For most CRTs, you can set brightness to the absolute minimum because the screen pot has enough headroom to bring black levels back to normal.
What does a broken Aperture Grille look like?
Sony Trinitron monitors use a mask called an Aperture Grille, and it's held in place by very thin and delicate wires going across the middle of the screen. If you look closely you can actually see the wires - a lot of Sony monitors came with a disclaimer that "seeing lines across the picture was normal" and to "please not call the seller or manufacturer as this is not a defect" :)
These wires are very fragile and if you drop the monitor hard enough the mask can actually detach from the wires. This is a permanent failure and it cannot be repaired. The colors on a Trinitron tube with a broken AG are very distrinctly messed up, it will look like a symmetrical rainbow:
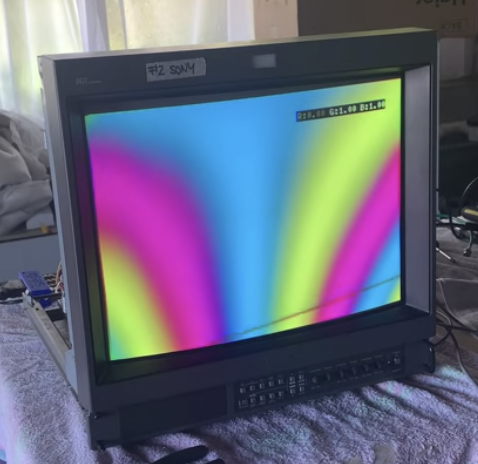
Image Credit: Matt House on Facebook