
This guide is for WinDAS, the Windows executable of Sony's DAS applications. If your monitor uses the older MS-DOS forms of Sony DAS then you will need to follow a different guide for setup.
WinDAS has been tested and working on Windows 10 and earlier. I do not know Windows 11 compatibility at this time.
Table of Contents
Connecting your monitor to your computer
USB to TTL serial
WinDAS requires a TTL serial connection - modern computers do not output serial over TTL so you need to use a serial adapter which does this for you. There are RS232 to TTL adapters if you are using an older Windows XP machine, or you can get common USB to TTL serial adapters which work with Windows XP through Windows 10. I used an Arduino USB programmer, which is just a common USB to TTL serial bus.
Cable from monitor to computer
Every WinDAS-compatible Sony monitor has the same 4-pin DIN connector on the back for programming. You have to remove the rear plastic shell from the chassis and then you'll find the 4-pin connector in the bottom right corner (usually). The order of the pins is RX TX 5v GND (left to right) and they should be labeled for clarity. All you need to do is run wires from these headers to the same headers on your serial TTL adapter. I made my own cable using a cable crimper and a DIP-spaced (2.54mm) crimp connector set off Amazon with some 26awg wire.
Don't connect 5v between your monitor and the serial TTL adapter - both sides of the cable will power themselves just fine. You only need to connect RX, TX, and GND.
Installing WinDAS
Download & Extract WinDAS
First start by downloading WinDAS from the Internet Archive here (or newer version here). Open the zip file and extract DASX\DASX\windas to a folder on your computer such as C:\windas. I will be using that path for the rest of this guide.
ActiveX \ MSFLXGRD.OCX Installation
Next, go to C:\windas\activex, right-click activex.bat and click Run as Administrator. This will install an OCX driver in your System32 folder and register it in Windows. You should get a DLL registration confirmation - click OK.
Launching WinDAS
Open C:\windas\windas.exe. You will get a message saying "No mdl files found" - this is normal and must be ignored.
Next, Choose Set-up -> Model Sel. This should open a window with a list of Sony monitor model numbers - if you don't see this then you did not correctly install the ActiveX \ MSFLXGRD.OCX file and WinDAS will not work until you can see the list of monitors on the Model Sel menu. Close WinDAS and figure out why your ActiveX installation failed.
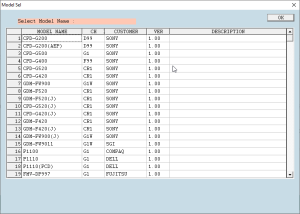
Next, find your model in the Model Sel list and double-click it. If you do not see your model in this list, it is not supported by this specific version of WinDAS and you likely need to use an older MS-DOS version of the program.
Configuring your Monitor
The first step is to make sure WinDAS can communicate with your monitor. Choose Set-up -> Config, click OK on the next screen, then make sure that the correct COM port is selected for your TTL serial adapter. Select "MANUAL" for the SG (signal generator) option since we do not use/need the Sony-approved signal generator connection. Next, go to File -> Save data to File, and then click Go. You should hear your monitor click once or twice while the progress bar downloads all the monitor settings over serial connection. Once it finishes, check to make sure the dat file is larger than 0 bytes. If its not, WinDAS cannot communicate with your monitor either due to the serial connection being wrong or because you did not select the monitor from the Model Sel list in the previous steps of this guide.
Now that you have saved your monitor's settings, you can view them by going to Help -> Expert and clicking Viewer. Load the dat file you saved and then double-click any of the categories in the lefthand list to view the settings within. For example, Reg_8_1 contains brightness settings like G2 level.
You can edit any of these settings in the dat file using a Hex Editor and then write the dat file back to the monitor using File -> Load data to Set. You can also change settings directly by going through the various adjustment procedures under the Adjustment menu on the top, but I find this to be pretty confusing and slow since its a guided process meant for service techs to follow step-by-step and does not make it quick or easy to just modify a few settings when you know what needs to be changed. Do whatever you are most comfortable with.
Footnote
More information can be found here