
Summary
The precursor to the M-Series of PVMs. Generally considered to be more reliable than the M series because the power supplies are less likely to fail. Also has a light-tinted tube which offers better contrast in dark viewing environments.
Manuals
Common Questions
- Why doesn't the H-Center adjustment on the back do anything? It's only for the Digital RGB input. Use the "Video Phase" pot inside the monitor to adjust centering (see service manual).
- What is "Digital RGB"? It's an input for old computers that output TTL RGB. It can't be used for game consoles.
- Why doesn't the RGB input have audio? Sony disabled it for everything but the 44Q model. See below for instructions on how to enable it.
- How do I make adjustments to this monitor? You have to take the case off and use the adjustment potentiometers in the back right corner of the main circuit board. See service manual for a list of adjustments and their locations.
Common Repairs
- Won't Power On: (degaussing coil makes sound and power light comes on but no noise from CRT or picture on screen) - check microfuse F602 on the power board using the continuity check or resistance check on your digital multimeter - its a little black block only a few mm in length. If your meter doesn't beep for continuity or shows "OL/Open" for resistance then the fuse has blown. You can either order the part on eBay for about $10 or replace it with a 0.8A to 1A fastblow glass fuse. You'll have to solder some legs onto the fuse or find a fuse with legs on it already (see image below). More info here.
- Won't Power On: (no power light or degaussing coil) - check glass fuse F601 and replace if needed. If fuse isn't blown, power off the monitor and carefully unplug the 6-pin "F5" connector from the top of the power board to expose the power rail output pins. Be careful as the first pin is 115v and stays live for a few minutes after the monitor has been powered off. Now power on the monitor and carefully measure the output of each pin using a multimeter in DC mode - one probe on the chassis metal and one probe on the pins, one at a time. You should be able to get around 115v from the first pin, 7-11v from the third pin, and 14-17v from the fourth pin. If one or more of those voltages is missing then you can diagnose the problem further on your own using the schematic.
- Flickering white dots/snow on a black screen: Replace C532 with the lowest possible ESR equivalent you can find.

Audio for RGB Inputs
Sony didn't provide an audio input jack for the 1341, 1342Q, 1343MD, 1941, 1942Q, or 1943MD. Only the 1344Q/1944Q has an audio input for RGB. However, I found a way to get around this limitation. Sony MUTES the audio input when you select "RGB" as the input - without this muting it would actually pull audio from the Line A input jack. So if you disable the muting you can use the Line A audio input for both RGB and Line A audio :) They use the "RGB" signal selector voltage to trigger a muting circuit for the audio, so if we take away the RGB signal from the QE board it no longer knows to mute the audio for RGB.
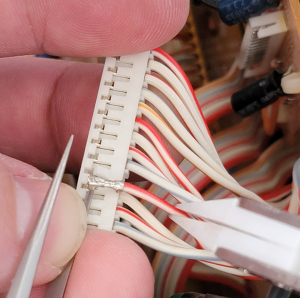
You can enable audio for RGB by simply removing the "RGB" wire on the "QE-2" connector of the QE board (Disassembling a Sony PVM for Repair). The QE board is the board attached to the back of the main input board, and the QE-2 connector is on the same side of the chassis as the power board The wire we want to remove is a red/white wire, 4th down from the top of the connector. If you are lazy you can cut the wire but it's preferable to neatly REMOVE it from the connector so that it can be restored to stock later if you choose to sell the monitor etc. It's just always good to avoid cutting things and making permanent mods when it can be easily avoided.
In order to remove the wire from the connector you simply slip a pair of tweezers under the locking leg of the connector and pull the wire out while you've got the leg lifted. See image below.
Once you lift it out cover the end with tape or a heatshrink tube since it does have some live voltage on it when the RGB input is active.
Gallery


| Specifications | |
|---|---|
| Brand: | Sony |
| Manufacturer: | Sony |
| Model: | 1942Q |
| Series: | PVM Q-Series |
| Viewable Size: | 19" |
| Input Signals: | Composite, S-Video, RGB, Digital RGB |
| Sync: | CSYNC, Sync on Green, Sync over Composite, Sync on Luma |
| Native Resolutions: | 240p, 480i |
| Linecount: | 600 TVL |
| Formats: | NTSC, PAL, NTSC4.43, SECAM |
| Aspect: | 4:3 |
| Adjustments: | Internal Potentiometers, External Potentiometers |
| Tube: | Sony Super Fine Pitch Trinitron , M49KGH20X |
| Deflection: | 90° |
| Mask: |
Aperture Grille

|
| Tint: | Light |
| Speakers: | Mono |
| Chassis: | SCC-D04B-A |
| Weight: | 68 lbs (30.8 kg) |
| Dimensions (W/H/D): |
452 x 458 x 513 mm
(17.8 x 18 x 20.2") |
| Application: | Professional |
| Cabinet Material: | Metal |
| Launched: | 1994 |
| Mounting: | Rackable |
| Degaussing: | Automatic on Power-on, Manual |